How to Make Stunning DIY Textured Wall Art Using Joint Compound
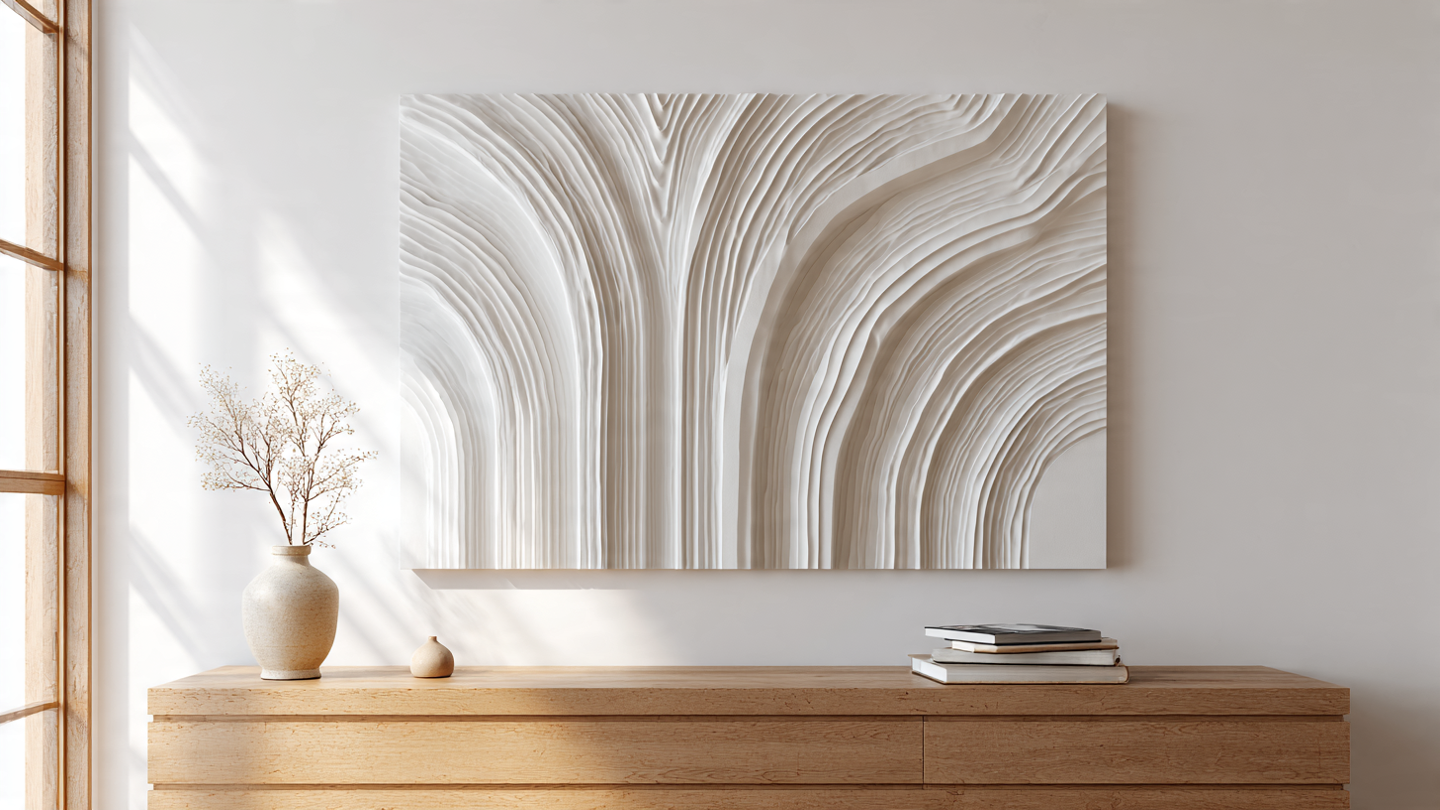
Ever scroll through Pinterest or high-end decor sites and fall in love with that gorgeous, minimalist 3D textured art? The kind with beautiful swoops and sculptural forms that looks like it costs a fortune?
Well, what if I told you that you could create that exact same high-end look for less than the price of a couple of fancy coffees? The secret weapon is a simple hardware store staple: joint compound.
In my experience creating dozens of pieces for my own home and for friends, this is one of the most rewarding and forgiving DIY projects out there. This guide will walk you through every single step, from gathering your materials to sealing your final masterpiece. Let’s create something beautiful together!
Key Takeaways: Textured Art in a Nutshell
For those who love to skim, here’s the quick version. Creating your own textured art is as simple as this:
- Prep Your Canvas: Start with a sturdy canvas or wood panel. A quick coat of gesso or primer helps the compound adhere better.
- Apply the Compound: Scoop a generous amount of all-purpose joint compound onto your canvas.
- Create Texture: Use tools like putty knives, notched trowels, or even old credit cards to spread, swirl, and sculpt the compound into your desired design.
- Dry and Seal: Allow the art to dry completely for 24-48 hours. Once dry, protect your work with a clear matte sealant.
Why You’ll Absolutely Love This DIY Project
Before we dive into the “how-to,” let’s talk about the “why.” This project is a game-changer for a few key reasons:
- Incredibly Affordable: The main ingredient, joint compound, costs around $10-$15 for a tub that will last you for multiple projects.
- Completely Customizable: You control the size, shape, colors, and texture. Your art will be a one-of-a-kind piece that perfectly matches your home’s aesthetic.
- Surprisingly Forgiving: Don’t like your design? Scrape it off and start again! It’s almost impossible to mess this up.
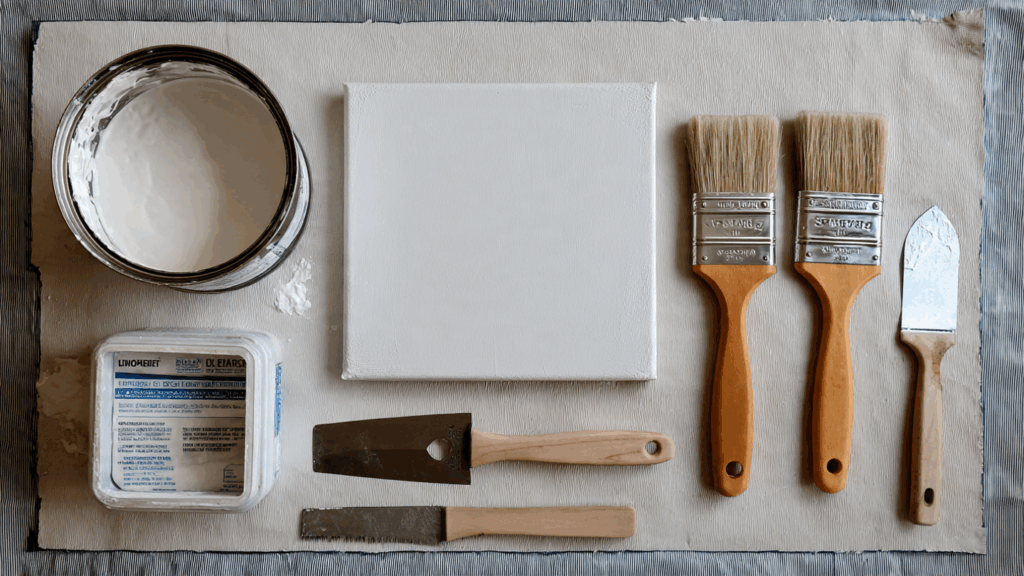
Gathering Your Supplies: The Textured Art Toolkit
Having the right tools makes all the difference. You don’t need anything fancy, and you might already have some of these items at home.
- A Sturdy Surface: A stretched canvas or a wood panel works best. For my first project, I used a 24×36 inch canvas, which is a great starting size. [Link to: How to Choose the Perfect Canvas for Your Wall Art]
- Joint Compound: I recommend an all-purpose, pre-mixed joint compound. It has a great, smooth consistency right out of the tub.
- Texturing Tools: This is where the fun begins!
- Putty Knives: A set with various sizes (1-inch, 3-inch, 6-inch) is perfect for creating different line widths.
- Notched Trowel: The kind used for tiling is excellent for creating clean, uniform ridges.
- (Optional) Cake Icing Spatulas, Old Combs, or Credit Cards: Get creative and see what patterns you can make!
- Canvas Primer (Gesso): While optional, a quick coat helps prevent the moisture from the compound from soaking into the canvas.
- Sandpaper (Fine-Grit): A 220-grit piece is useful for smoothing any sharp or unwanted edges after drying.
- Clear Matte Sealant Spray: This is crucial for protecting your art from dust and preventing any future cracking or crumbling.
Affiliate Suggestion:
- Product: Gold-Plated Stainless Steel Putty Knife Set on Amazon
- How to mention it: “For a really professional look, I love using a gold-plated putty knife set. They aren’t just for looks; they are often more flexible and easier to clean than basic plastic ones, giving you smoother glides as you create your texture.”
Step-by-Step Guide to Creating Your Masterpiece
Ready to get your hands dirty? Let’s break down the process into simple, manageable steps.
Step 1: Prep Your Workspace & Canvas
First things first, lay down a drop cloth or some old newspaper. This project can get a little messy, but that’s part of the fun!
If you’re using a canvas, apply one even coat of gesso or primer and let it dry completely. This usually takes about 30-60 minutes. This step ensures your final piece is durable and the joint compound sticks perfectly.
Step 2: Apply the Joint Compound
Using a large putty knife, scoop a generous amount of joint compound onto your canvas. Think of it like icing a cake. Don’t be shy!
Spread a thick, relatively even layer across the entire surface. I recommend a layer that is about 1/4 inch (or 0.6 cm) thick. This gives you plenty of material to create deep, satisfying textures.
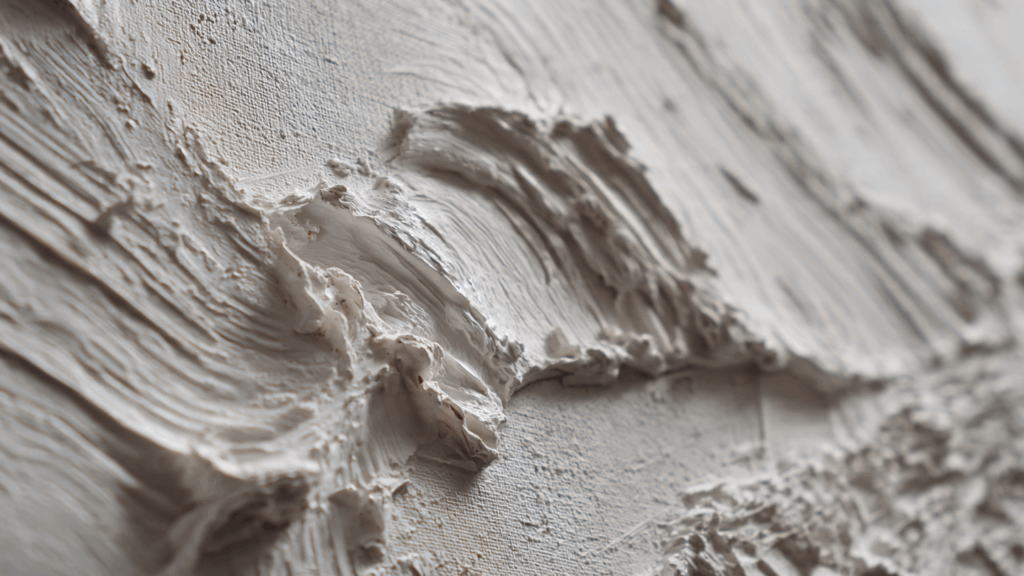
Step 3: Create Your Texture!
This is your moment to be an artist. There are no rules here.
- For clean lines: Use a notched trowel and pull it straight across the canvas.
- For soft arches: Use a wide putty knife and create semi-circular “rainbow” shapes.
- For organic swoops: Use a small putty knife and move it in a fluid, S-shaped motion.
Pro Tip: What I’ve found works best is to practice your movements on a piece of cardboard first. This helps you get a feel for the tools and the consistency of the compound before committing to your canvas.
Step 4: Let It Dry Completely
Patience is key. Place your artwork somewhere flat where it won’t be disturbed. It needs to dry for at least 24 hours, and for very thick applications, it could take up to 48 hours.
Resist the urge to touch it! Touching it while it’s wet will smudge your design, and touching it while it’s partially dry can cause it to crack.
Step 5: (Optional) Sanding and Painting
Once completely dry, you can gently sand down any rough or sharp peaks with your fine-grit sandpaper for a softer finish.
If you want to add color, now is the time! You can paint the entire piece with acrylic or latex wall paint for a bold, monochrome look. Some people even mix a small amount of acrylic paint directly into the joint compound before applying it for a beautiful, integrated color.
Step 6: Seal Your Artwork
This is the final and most important step for longevity. Take your art to a well-ventilated area (or outside) and apply 2-3 light coats of clear matte sealant spray. This protects it from moisture and dust and locks in the texture.
And that’s it! You now have a stunning piece of custom art to hang on your wall.
Pro Tips for Flawless Textured Art
Here are a few secrets I’ve learned along the way:
- To Prevent Cracking: The number one cause of cracking is applying the compound too thick and having it dry too quickly. Stick to layers no thicker than 1/2 inch and let it dry naturally away from direct heat or fans.
- Adding Color: To tint your compound, add a small amount of acrylic paint to a separate bowl of compound and mix thoroughly. I’d say a ratio of 1 part paint to 10 parts compound is a good starting point to avoid changing the consistency too much.
- Cleaning Your Tools: Clean your tools immediately after you’re done. Dried joint compound is like cement and is very difficult to remove!
Frequently Asked Questions (FAQ)
Can I use any type of joint compound for art? For best results, use an all-purpose or “topping” pre-mixed joint compound. Avoid “hot mud” or setting-type compounds that dry very quickly through a chemical reaction, as they are much harder to work with for art projects.
Do I have to prime my canvas first? While you can apply it directly, I highly recommend priming with gesso. It creates a better surface for adhesion and prevents the canvas from absorbing too much moisture, which can cause it to sag over time.
How do I hang my finished joint compound art? The finished piece will be heavier than a normal painting. Ensure you use proper wall anchors and screws rated for the weight of your art, especially for larger canvases. [Link to: The Ultimate Guide to Hanging Heavy Wall Decor Safely]
Ready to Create?
Creating DIY textured wall art with joint compound is more than just a project; it’s a creative process that allows you to make something truly unique for your home. It proves that you don’t need a huge budget to have beautiful, impactful decor.
For more information on the chemistry and drying properties of different drywall compounds, this guide from [Suggestion: A major paint/building supply manufacturer like Behr or USG] can be a fantastic resource.
Now I’d love to hear from you! Are you going to give this project a try? Leave a comment below with any questions you have or share how your project turns out!
And if you loved this tutorial, be sure to check out our other budget-friendly decor guides, like our post on [Link to: How to Create a Stunning Gallery Wall on a Budget].